On the first Amiga the entire OS consumed only around 1.1 MB of storage in two pieces. Kickstart and Workbench. Kickstart is the Amiga equivalent of a BIOS but it is so much more. A fair amount of the system is a “ROM chip” in a physical machine, though sometimes it was loaded from disk. Workbench is the graphical UI. So when we set up the emulator we already “installed” part of the OS…
A floppy disk based Amiga can just as easily boot a game instead of an operating system, but guess how much it takes to boot the Amiga to a “command prompt” interface? An “empty” floppy disk.
Quite literally a floppy disk with a “boot sector” (1K) configured and no files can be inserted into an Amiga and you’ll get a command prompt environment inside a window that you can resize with the mouse! You can’t actually DO much of note because you have no “commands” to run (actually there are a very small number of built-in commands in later ROMs like 3.1), but it may surprise some people how much of a windowed operating system will fit into 512K of “ROM”… Remember it includes that floppy disk animation too!
Anyway, the 3.x releases of Amiga OS consist of five general floppy disks and you can run an Amiga that way, though it is somewhat awkward requiring lots of disk changes, though you could set up three extra floppy drives (Amiga supports four floppy drives and I suspect most users had at least one external drive with their real Amiga computers) and with Workbench in the first put all but Locale in the extra drives to reduce disk swapping. What we want is to “install” those onto our “hard drive”.
FS-UAE allows you to insert any “floppy disk” you’ve told it about in the configuration (you cannot insert arbitrary disk, though this is I think planned for a future version of FS-UAE) and to do this you access the emulator’s menu by pressing F12 on your keyboard.
The menu is designed to work a bit like a joystick based arcade game menu system or like a DVD/Blu-Ray menu with a remote control… Move the highlight with the cursor keys (up/down mostly) and select with enter.
If you move “up” from the “Pause” option the highlight will be on an ‘X’ icon (and this is a rare location where the menu system has left/right controls) which is one way to exit the emulator, and useful for “full screen” use as a retro gaming emulator.
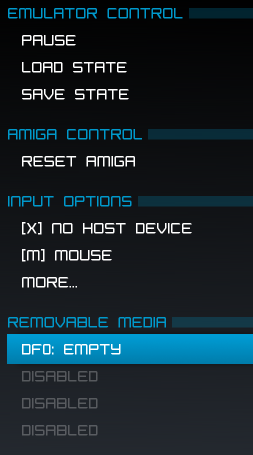
Move the highlight down to “DF0: EMPTY” and hit enter to bring up the disk selection menu. This has “EJECT” at the top (disabled as there is no disk “inserted” and the Amiga OS disks listed in the configuration file.
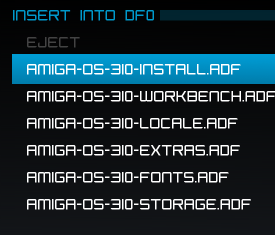
In the configuration file the order of the files I gave was not alphabetical but actually the order the disks will be required. This will make things a lot easier.
Move the selection down one from the eject option to the “INSTALL” disk and hit enter and you should be treated with some lovely “mechanical” sounds (if you have your host machine sound turned on).
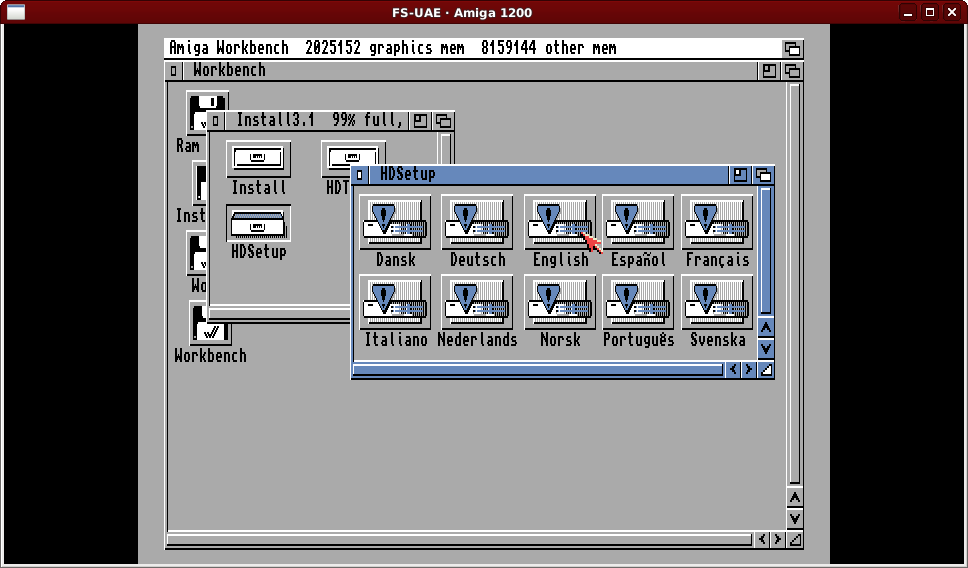
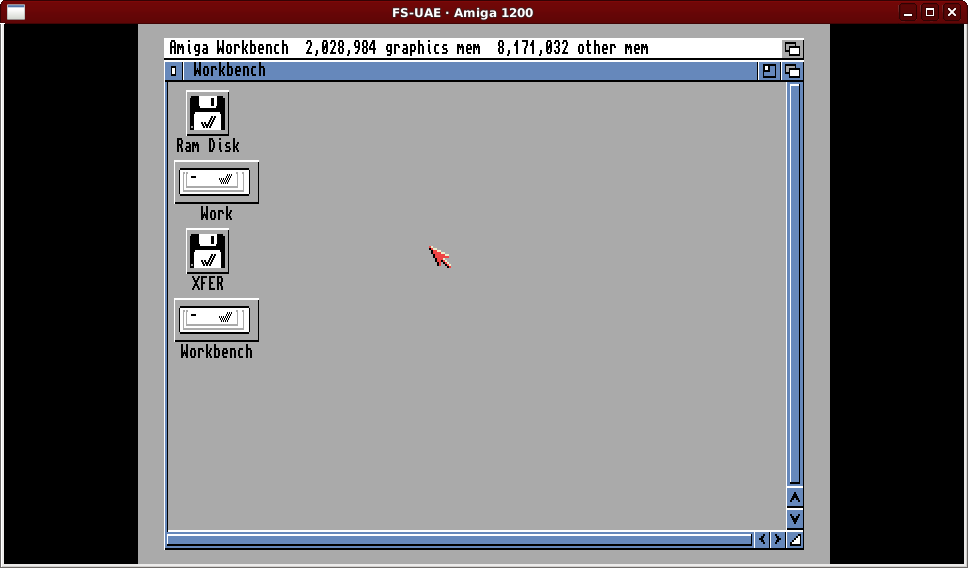
After a few seconds you should the emulated machine boot, and show a mostly grey “Workbench” screen/window with two icons for “Ram Disk” and “Install3.1”.
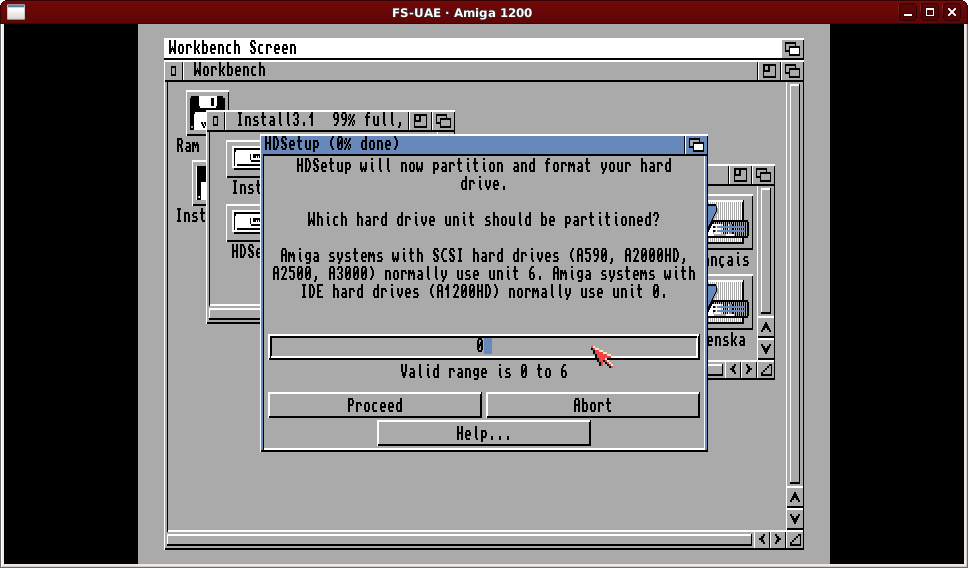
Notice the lack of any icon for a hard disk? Let’s get that sorted out… Double click (not too quickly, not too slowly) on the install disk icon, and a window will open up. Double click on the “HDSetup” drawer icon and you will see a range of languages. Unless you want to swap disks a lot, double click on “English”.
You’ll be asked what you want to do and you should select the “Partition Hard Drive” option (default) and click proceed.
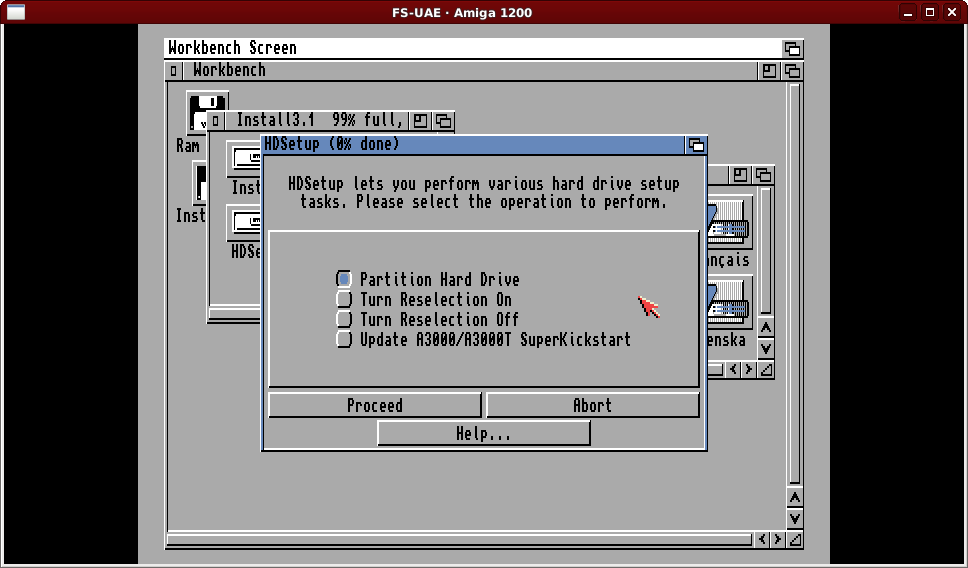
The next part is important. Historically Amiga systems used SCSI for hard drives. Every SCSI device has an ID number from 0 to 7 and convention says the host (computer) has ID 7. Commodore shipped their hard drive systems with the hard drive set to ID 6, so this is the default. However when Commodore started shipping systems with IDE hard drives that don’t actually have ID numbers, in software the ID number is zero. As we are emulating an A1200 (and remember we set “ide0” in the configuration file) the default value of six should be changed to a zero.
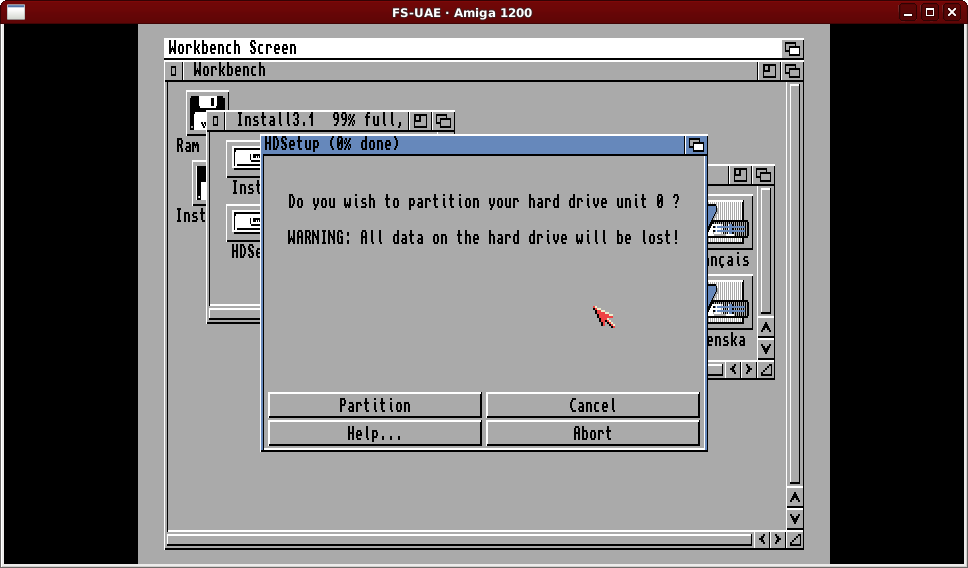
There will be some confirmations you will need to do but the HDSetup program will (thinking it is a real hard drive) populate the previously mostly empty “hdf” file with the filing system structures required to use the “hard drive”.
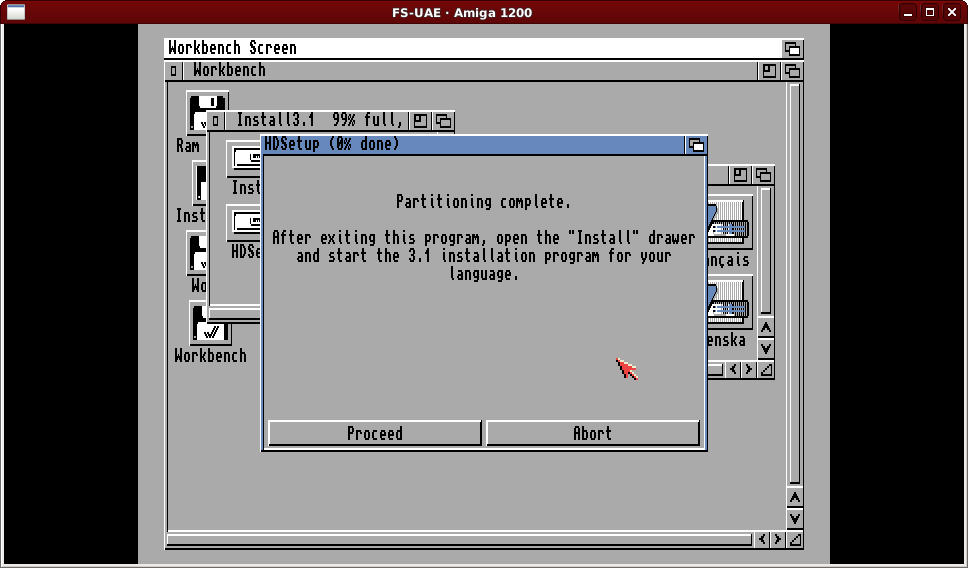
The system will pretty much split off 10 MB of the 500 MB for system information and for “Workbench” (the partition will be approximately 8.5 MB “usable”) and the remaining 490 MB as a data drive for your “Work”. If we were to use HDToolbox instead of (or after) HDSetup we could adjust this, but we’ll work with this split.
Close the HDSetup “language select” window and open the “Install” drawer. You will see another language selection and as you can probably guess we’re going to suggest you choose English to avoid any “disk swaps”.
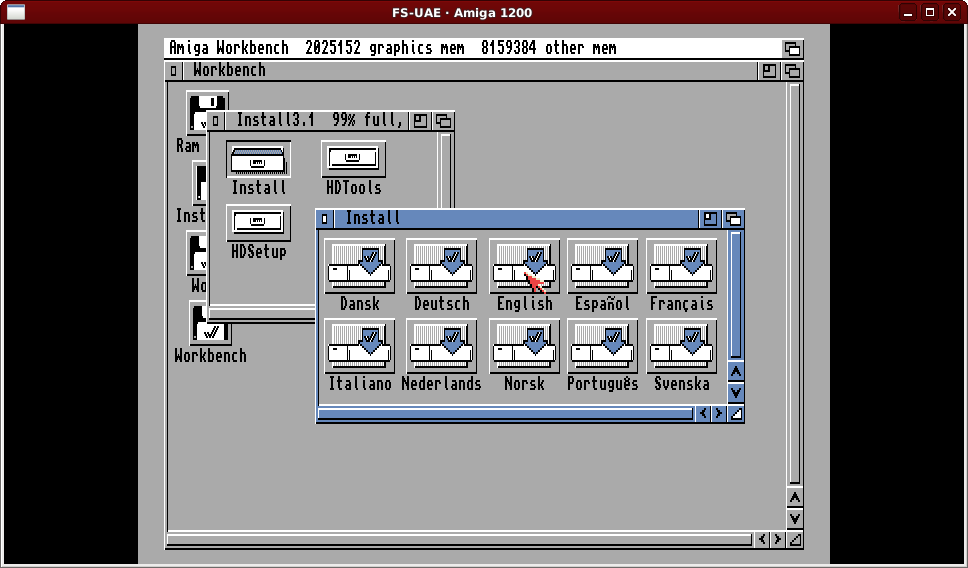
The installer does have a secondary purpose but the prime purpose is to install “Release 3.1 of the Amiga Operating System”.
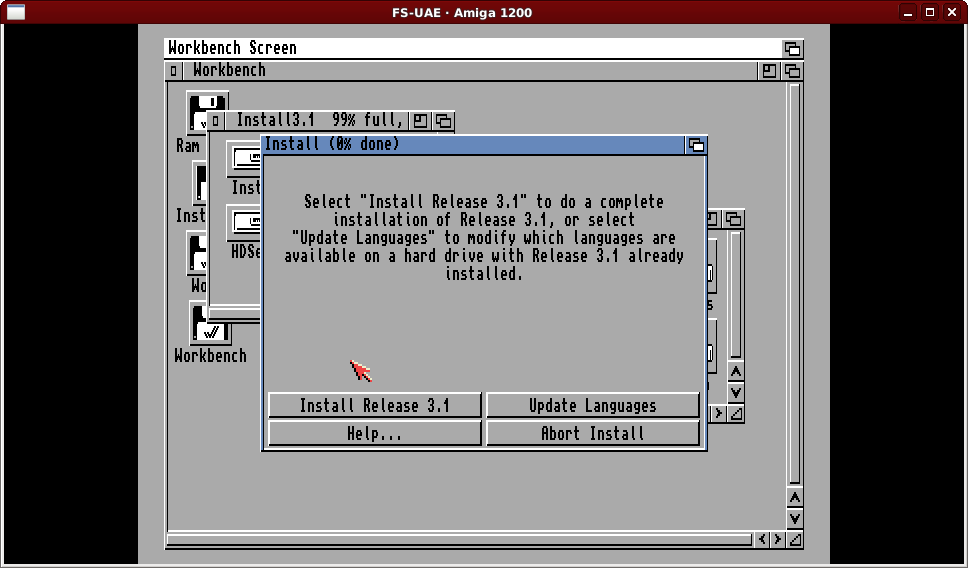
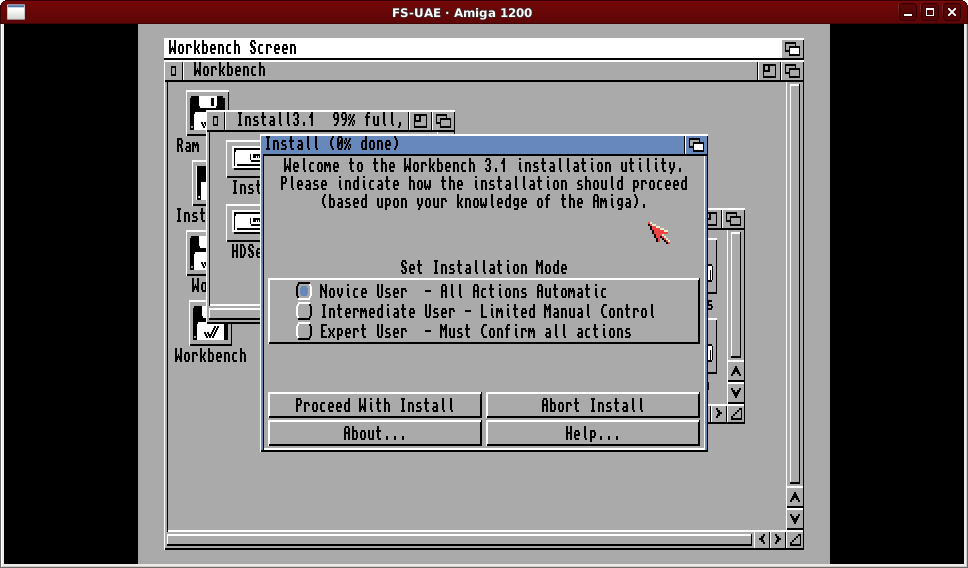
Mostly the prompts at the start can just be left at defaults (e.g. no printers) but when it asks about “keymaps” I tend to choose both American and British. In truth with the default “Novice” installation I think it installs everything anyway but for peace of mind I always JUST select these two.

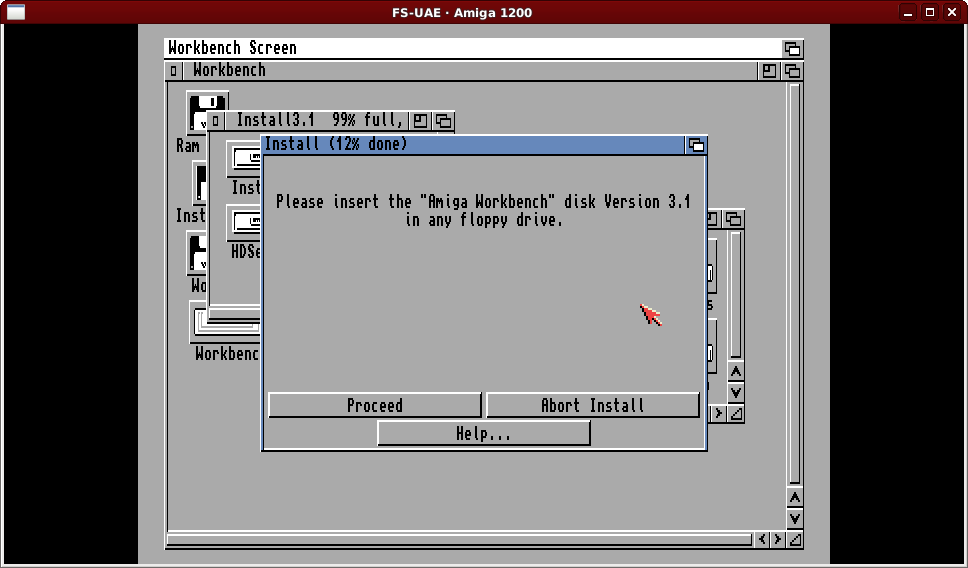
You will fairly quickly be asked for the Workbench disk and have a button to proceed. In the FS-UAE “F12” menu, select the option showing the install disk and hit enter to see the list of the “adf” files. Cursor down one to Workbench and hit enter (So F12, Enter, Down, Enter). Do not do anything “on the Amiga” even though it looks like you have to click a button to proceed. The Amiga will actually “detect” the correct disk and proceed automatically until it requires the Locale disk (it won’t need that for long) then Extras, Fonts, and Storage. At the “end” it will ask for the Install disk again and it will copy a few remaining items.
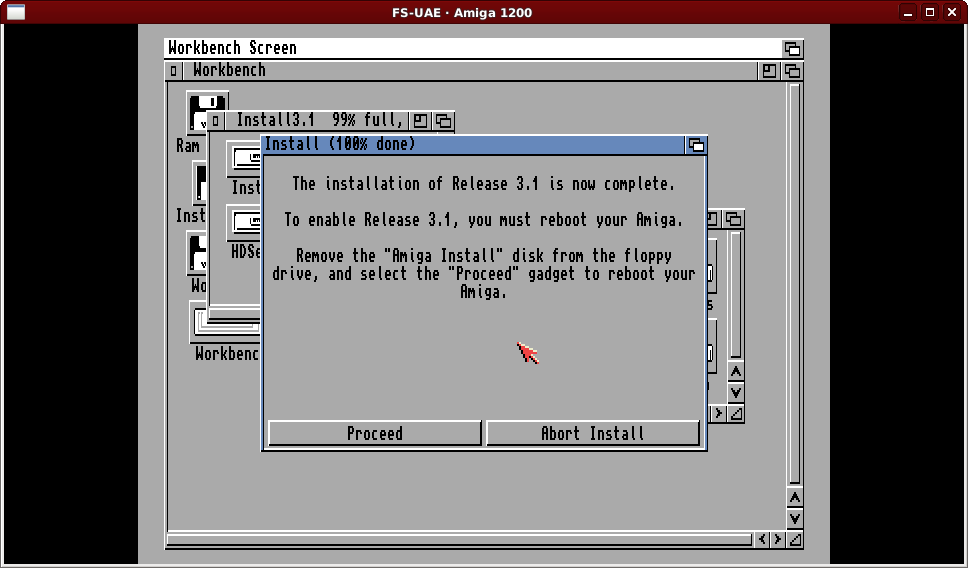
Not long after the second insertion of the Install disk it will prompt you to remove the install disk and to click on the Proceed button.
Within FS-UAE just bring up the disk menu as before and cursor up to the “Eject” option. In the Amiga click Proceed and the machine will reboot into a hard disk Workbench environment!

Wait maybe 15 to 20 seconds… Do you have sound turned on? Is that clicking annoying? Welcome to the Amiga.
The “magic” that was the installer “detecting” you change disks in FS-UAE is related to the Amiga hardware design. The drives have a mechanism to detect disk removals virtually straight away, but to detect insertions the Amiga has to move the read/write heads to get a valid reading. The Amiga does this test periodically whenever there is no disk in the drive. Amiga hard drive owners quickly got into the habit of inserting disks even if they didn’t want to use them until special “No Click” utilities became available. We’ll use a different method, and perform a useful configuration change at the same time.
Use the FS-UAE menu ‘X’ option to close the emulator and go back to the “Default.fs-uae” file in your editor and edit it to read as follows (three new lines).
[fs-uae]
amiga_model = A1200
chip_memory = 2048
fast_memory = 8192
joystick_port_1 = nothing
hard_drive_0 = AmigaDev.hdf
hard_drive_0_controller = ide0
hard_drive_1 = AmigaDev_XFER
hard_drive_1_label = XFER
kickstart_file = amiga-os-310-a1200.rom
save_disk = 0
floppy_image_0 = amiga-os-310-install.adf
floppy_image_1 = amiga-os-310-workbench.adf
floppy_image_2 = amiga-os-310-locale.adf
floppy_image_3 = amiga-os-310-extras.adf
floppy_image_4 = amiga-os-310-fonts.adf
floppy_image_5 = amiga-os-310-storage.adf
floppy_drive_volume = 0
What we are adding is a “transfer” folder to load things into the Amiga from outside and telling the emulator floppy drive sound to “shut up”! Feel free to get the authentic experience by not adding the “volume” line if you’re a masochist…
You will also need to create a folder called “AmigaDev_XFER” (as per configuration file) under the FS-UAE “Hard Drives” folder (alongside the AmigaDev.hdf file during the emulator setup).
Start FS-UAE again and you should see something like the following:
Just a cosmetic issue but I think we want to make the “XFER” area icon look like the Workbench and Work drives.
Double click on Workbench, then on System, and finally on Shell. Click the icon second from the right in the Shell window (a white box inside a larger blue box known as the zoom gadget) and the Shell window will expand.
First type in the command “Info” and hit enter and the Amiga will show a list of the drives available.
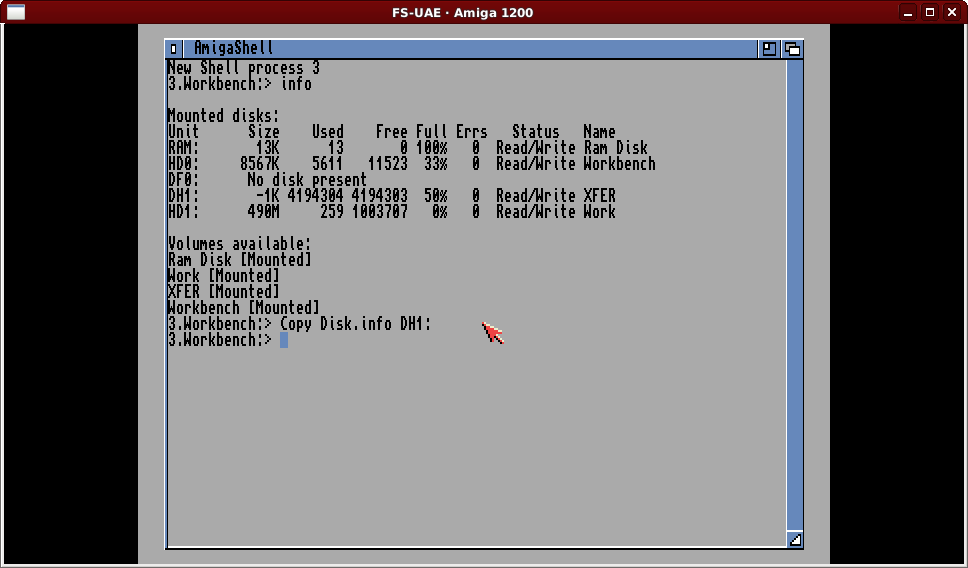
Amiga drives can be referred to by device name (unit) or by the title (name). The Amiga always (ish) has a device “DF0:” for the floppy drive (and potentially also “DF1:”, “DF2:” and “DF3:” as the Amiga supports four floppy drives at once) and typically “RAM:” for a section of memory that can be used like a disk for temporary files or similar. Most operating systems steadily accumulate “junk” in a temporary folder (or several) but not the Amiga… mostly…
Originally hard drives on the Amiga followed a “DH0:” etc naming convention (similar to DF0: for floppy drives), but what the “HDSetup” program does for “IDE” drives is name them with an “HD0:” etc convention. It is technically possible to change this (ideally before the “Install” program is run) but we’ll leave it alone. The first partition “Workbench” is on “HD0:” and the second partition “Work” is on “HD1:”.
Because we did not specify a “controller” for the second drive FS-UAE defaults to the “SCSI model”, but in this case the drive is not “DH0:” but “DH1:”.
The Amiga looks for a special file called “Disk.info” at the root level of every drive to determine the icon to use (actually the file IS the icon), so what we will do is copy the Disk.info file from the Workbench disk (default working directory for the Amiga shell) to the transfer area (the DH1: device).
After issuing the “Copy” command pictured above wait a few second then press the key combination Ctrl (left hand one assuming you have two), Windows (most keyboards have this) and Page Down and the emulated Amiga will reboot. Amiga computers will by default reboot if a user presses the Ctrl key (Amiga has only one) and the two Amiga keys. It’s the Amiga equivalent of Ctrl-Alt-Del on PCs and Ctrl-Win-PgDn is FS-UAE’s default mapping for the Amiga’s “three finger salute”.
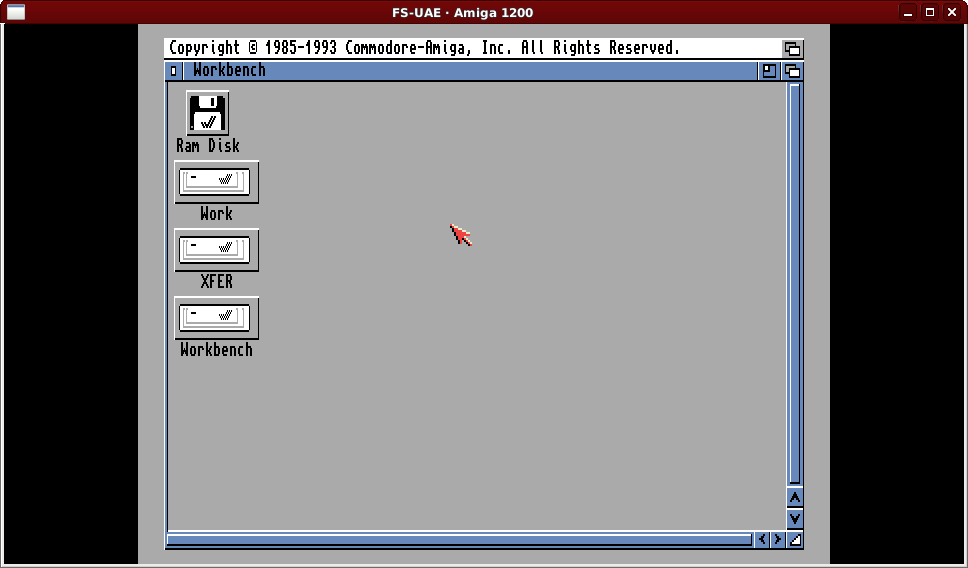
As if by magic… You’ll now have three hard drive icons… and a floppy disk icon for the “Ram Disk”… Well you can’t have everything…
We’ll conclude this post now, so just F12 and ‘X’ out of the emulator.
One very very last thing. Now might be a good time to “backup” the AmigaDev.hdf file in case anything goes wrong in future steps. One file, copy, paste, done. More efficient in the long run than copying a folder with hundreds or eventually thousands of tiny files, at the expense of some disk space.