So… we’ve set up an emulator, we didn’t pick a favourite host operating system to do so, we configured the emulator, we installed the Amiga operating system, and we managed to snag a “developer kit”. That’s all we need, right?
No.
In the 80s and 90s Commodore partnered with developers of compilers and assemblers (sometimes a little too closely) so a “developer kit” really just contained a bunch of support files. Not only that but commercial compilers and assemblers typically were licensed to include relevant portions of Commodore’s Native Developer Kit (NDK). Commodore had neither the means nor inclination to support compilers or assemblers, so they left that to others.
It is still (apparently) possible to get some commercial tools but these days they are extremely rare. There are plenty of free tools though, and Aminet, one of the longest standing freeware and shareware software repositories ever (I would think) is still standing, so that is the route we will take.
There will be some overlap but this allows a certain amount of flexibility and compatibility, if required.
As well as the NDK (mentioned in a previous article) we will want the following files download from Aminet, and stored in the “AmigaDev_XFER” hard drive folder.
lha.run from util/arc – file compression system similar to ZIP
blink67.lzh from dev/misc – an almost de-facto “program linker”
PhxAss.lha from dev/asm – a 680×0 macro assembler
PhxLnk432.lha from dev/asm – another linker this one related to PhxAss
Installer-43_3.lha from util/misc – the standard Amiga installer program (updated)
vbcc_bin_amigaos68k.lha from dev/c – a C compiler, part 1
vbcc_target_m68k-amiga.lha from dev/c – part 2 of above
make_bin.lha from dev/c – a “make” tool (make sure to grab this exact one, referencing 3.76.1, SAS/C and “no ixemul”)
vim60bin.lha from text/edit – a version of the Unix classic “vi” editor
Redit.lha from text/edit – a simple more Amiga like editor
The “vbcc” compiler includes its own linker (vlink) and and assembler (vasm) meaning we have two assemblers and three linkers at our disposal with this collection. Having already done some experimentation vasm and vlink are most likely what we will be using, but it’s always good to have choices.
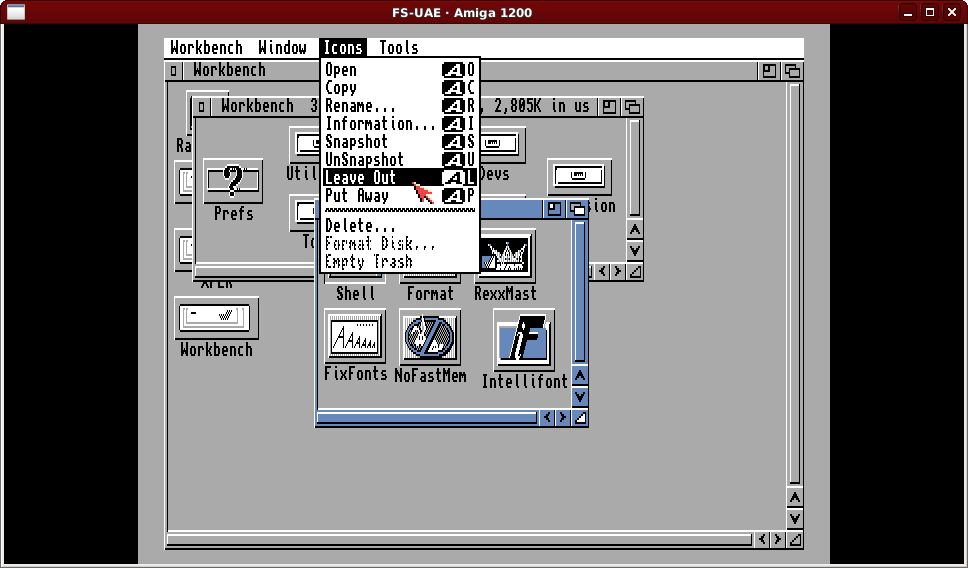
Because we will be using the Amiga Shell quite heavily we will make this easier to use. Double click on the Workbench disk icon, then on the System drawer and then single click on the Shell icon. Now press and hold on the right mouse button and the white title bar at the top of the “screen” will show a menu bar. Move the Amiga mouse pointer up to the Icons menu, down to the “Leave Out” menu item and release the right mouse button. The Shell icon will move to the main Workbench window under the disk icons.
We will also modify the settings to open a full screen window. Single click on the Shell icon and use the right mouse button again, this time selecting Information from the Icons menu. You will see a few items of information but the item we want to change is the WINDOW setting.
WINDOW=CON:0/50//130/AmigaShell/CLOSE
Click on this and the line will be moved to the “edit” box where you can change it. The “50” relates to the vertical position of the window and the “130” relates to the size. Change these values to “0” and “256” so that we have the following.
WINDOW=CON:0/0//256/AmigaShell/CLOSE
Click on the Save button and we’re ready to test – Ctrl-Win-PgDown and the “Amiga” will reboot and a few seconds later Workbench will appear with our Shell icon, and double clicking on that should bring up a large AmigaShell window.
First thing we’ll do is set ourselves to work in the Amiga “temporary” file area called “T:” which is located in the “Ram Disk” which goes away when the Amiga is rebooted (clean and efficient) and make a folder on our “hard drive” for documentation.
Cd t:
MakeDir HD0:ToolsDocs
Because most Amiga files will be compressed similar to how ZIP files work we will need the LhA “archiver” which is a self-extracting archive. We will copy the program to the Amiga commands file area called “C:” (shorthand for commands or CLI) and the documentation to the folder mentioned above, then we will tidy up after ourselves.
DH1:lha.run
Copy lha_68020 c:lha
Copy LhA.guide hd0:toolsdocs
Delete #?
With that last line you may get “stumped” on how to get the ‘#’ sign. Whilst I usually like to have a “British” layout on my computers in this instance the Amiga’s “American” layout makes things much easier as the layout is closer to the normal keyboard layouts of today. The ‘#’ symbol is accessed via Shift-3 in this case. If you have been playing around (maybe having prior Amiga experience) and set it to “British” layout the ‘#’ sign will likely be on the key you would use for a single quote.
A comment now on the Amiga shell and file system. The Amiga is “case preserving” and not “case sensitive”, so for the most part case is just aesthetic. The Amiga uses the ‘?’ character for a single wildcard character and ‘#’ to indicate zero or more repetitions, thus the “#?” construction is similar to ‘*’ on Unix/Linux or “*.*” on DOS/Windows.
The Amiga does not need “extensions” or “suffixes” to designate file types, but a lot of the time a filename will have an extension or suffix to help identify the files as per other systems, particularly regarding source code or archives. Notably executable file usually do not have extensions. On Aminet the self-extracting LhA archiver is a notable exception to clearly indicate it is executable and not a plain archive. The “.guide” file is a special type of text document called AmigaGuide, which is a form of “hyper text” that includes navigation within the document. The first “web” technology was based on the same idea.
Now we have our archiver we can “install” our first developer tool, this is the classic “Blink” linker which was very popular and always handy to have around, though we will likely barely use this.
Lha x dh1:blink67.lzh
Copy Blink c:
Copy Blink.doc hd0:toolsdocs
Delete #?
This is much the same as the archiver – extract, copy the tool, copy the documentation, cleanup. A recap on file extensions – the Amiga (mostly) does not require file extensions itself. The “.doc” file here is certainly not a Microsoft Word document. It is just a text file with “.doc” to indicate it is documentation.
Now something a little more involved, the PhxAss 680×0 assembler.
lha x dh1:PhxAss
copy PhxAss/PhxAss c:
copy PhxAss/PhxAss.guide hd0:toolsdocs
delete #? all
A couple of things to note… We didn’t specify “PhxAss.lha” in the first line – It turns out if an archive file ends “.lha” and doesn’t contain a dot anywhere else in the name we don’t need to specify the full name when we are extracting. Second the archive includes a folder PhxAss, so this demonstrates the Amiga directory separator ‘/’. Lastly the “delete” command has the word “all” at the end. Why?
Normally “#?” means all files in the current (or specified) directory, but it does not include subfolders. The “delete” command understands “all” as a parameter to mean “include subfolders”. This is a VERY powerful and potentially dangerous command. Any time you use “all” with the “delete” command be extremely careful. I remember I wasn’t careful once in the early 90s.
We treat PhxLnk basically the same way as PhxAss (not surprisingly considering the similarity of the name).
lha x dh1:phxlnk432
copy PhxLnk/OS3.X/PhxLnk c:
copy PhxLnk/PhxLnk.guide hd0:toolsdocs
delete #? all
We will take a break from developer tools, as we will very shortly need to use the graphical installer as was used during OS installation. We will however grab a more up-to-date version and make it a “command” as this is a requirement for the C compiler we will install.
Lha x dh1:Installer-43_3.lha
Copy Installer43_3/Installer c:
Copy Installer43_3/Installer.guide hd0:toolsdocs
Delete #? all
This is where we’ll break for now as this post is already getting quite long, plus we can treat installing a working C compiler as a post by itself.